How To Test Your WordPress Website Before Updating It (Step-By-Step Process & Tools)
It’s easy to just go ahead and update your WordPress website, your theme, and plugin files by yourself. You just hit the “update” button three times and the job is, well… mostly done.
You think that.
Everybody thinks that too.
But that’s not where the real challenge lies and where some issues might arise eventually. The “real deal” happens seconds after your updates, when you’ll need to check and test if your website is still working the way you want.
What if you’ve just updated your live site and you broke it?
That’s going to be painful! And this isn’t the worst scenario: what if the website breaks only on certain devices but you don’t realize it because you are viewing it from your desktop? To you everything seemed okay, didn’t it?!
I could go on with other examples, such as:
- What if your checkout page is not working on iPhone anymore?
- What if your contact form is not working on Safari?
- What if your mobile menu is not opening on Android?
- What if your product reviews do not show anymore on Firefox?
- What if your footer disappears on the Edge browser?
The list is almost endless. And you thought it was just a “quick” update, uh?
So now let me ask you:
How many incomplete updates will your business be able to afford?
How much money are you willing to lose because of failed updates?
If you’re a savvy business owner, I think I know your answer. But don’t despair, there’s a powerful way to lower the chances of experiencing such issues to their minimum. It’s called: proper testing.
Why testing ought to be part of your regular maintenance activity
If you value your website, as I’m sure any business owner does, you certainly know it’s going to be a biiiiig problem if your website will stop working for a day or even two.
If that happens – you might already know – you are going to experience at least one of the following:
- Lost traffic
- Lost credibility
- Lost prospects who were interested in buying your product
Bottom line is, when your website or eCommerce isn’t correctly updated so that it can’t run properly, you’ll lose money. That’s the most important aspect you should be aware of.
While on the other hand, having the proper tools and processes in place to test your website after an update are beneficial in many ways:
- Your website will keep running smoothly after each update
- Your website will be more secure
- Your website will run faster
- Your visitors won’t be affected by the update at all, hence their trust in your business will remain strong
In this article, I’ll share with you some of the best practices, tips, and tricks as well as tools for testing your WordPress website and making sure it works great after you update it.
So, if you want to learn how to properly test your website (right after updates) and are willing to learn from those who do this for a living, please read on.
How to get better at WordPress testing
Testing is a repetitive yet crucial task. As such, it might get boring and time-consuming for you.
Here’s how to prevent this from happening.
In order for you to overcome these annoyances and limitations of repetitive testing, you’d need to focus your efforts and have in place a twofold strategy based on:
- Proper tools for testing – some of the testing can be faster and/or better if you use the appropriate tools
- A checklist or so-called process outlining all the big and small steps you need to undertake after an update. This checklist will ensure you have a thoroughly tested website every time you update your WordPress without missing anything
Let’s take a closer look at each of them and see how to actually perform the testing correctly.
How to test WordPress websites: the tools
After many (yep, really lots of) hours spent on updating different WordPress websites at WPRiders – the agency I run – my teammates and I have come up with a handful of tools and a checklist for proper testing after an update.
Here’s a brief list of the tools we are using to ensure a high-quality testing process:
- Staging site – If you want a safe WordPress update you need to use a staging site. A staging site is a perfect clone/copy of your live site where you can perform all the updates and do the testing without affecting the live site.
- Screenshot creation tools – there are tools that can create a full-page screenshot of your website before and after the updates.
- Screenshot comparison tools – these tools will help you automatically check the 2 screenshots before and after the update and quickly spot out any changes and inconsistencies.
- Automated script testing – you can have a battery of test scripts that will click around your website after the update to ensure the website is still working as intended.
Don’t forget: good tools should enhance your work, having a sort of multiplier effect to your own eyes and hands. But before “multiplying yourself”, you need to make sure you are doing the right things. And do that in the right order. That’s the process.
How to test WordPress websites: the process
A good process in place is the cornerstone of a successful WordPress update that ensures you are doing the right thing each time after an update.
Here’s the process we use at WPRiders that we are thrilled to share with you. So here it goes.
Before the updating process
-
- Make a list with all “premium” themes and plugins (aka premium items) that do not get updated automatically.
- On the website through which you bought them, check the latest version available of premium themes or plugins you’re using in your install. Common marketplaces are Theme Forest, CodeCanyon, etc. – DO NOT rely only on what WordPress reports as the latest version in the backend.
- Make a list of URLs (let’s call it the URL list) that you are going to test after the update. These should include all your WordPress templates (don’t forget about your Custom Post Types templates), your main pages like the homepage, contact page, category pages, and product pages, as well as your checkout pages.
- Make a list of test scenarios to be checked after the upgrade. A test scenario is like a visitor journey through your site and includes a list of pages and actions that the user is going to perform. An example of a test scenario is:
- Open homepage
- Scroll down up to the “Call to action” button
- Fill in “someemail@dummy.com” in the email field
- Press Submit button
- Create your set of automated test scripts for checking these scenarios. If you don’t have any idea about this topic, don’t worry I’ll share with you some examples of Codeception scripts that we are using.
On staging site
-
- Clone your entire website to a staging environment. Make sure the PHP and MySQL versions on your staging match the ones from your live environment. Some hosting providers like SiteGround, WPEngine, or GetFlyWheel offer one-click staging creation.
- Check that your staging site is ok. Just a routine check to make sure the clone is perfect would make the cut here.
- Now, before updating the website, go ahead and create a set of screenshots for all your URLs from the URL list on staging. These files are your baseline if anything will break during or after the update process. Take screenshots on Chrome, Safari, Firefox on Mac, Edge on Windows (latest versions), iPhone, Android phone. Too many? I know, but don’t despair there are specific tools for creating them automatically (see below).
- Update your website on staging. Specifically, make sure you’re going to update:
- WordPress core files
- Theme files
- Plugin files
- Don’t forget to manually update those items that don’t have an automated update
- Repeat step 7 again and create screenshots on the updated website from your staging. Don’t forget to create screenshots for all your URLs from the URL list as well as for Chrome, Safari, Firefox on Mac, Edge on Windows (latest versions), iPhone, Android phone.
- Now it’s time for you to compare all your screenshots before and after the update. Every URL from your URL list, and every browser. You should not leave behind any of them. Even for this activity, there are tools that will automate the process. So please bear with me.
- Run the test scripts that you created at point #5 to make sure your checkout, your contact forms, and other critical parts of your website still work. Make sure you run your scripts on all major browsers and devices. We suggest Chrome, Safari, Firefox on Mac, Edge on Windows (latest versions), iPhone, Android phone.
On live site
Please be sure not to perform the following steps on a Friday, ok?
- Do a backup of your live website
- Take screenshots for all the URLs in your list. Basically, you repeat what you did at #8 on your staging site, but now you do it on your live site.
- Update your live site. See notes from #9 for your staging site.
- Check if there are any outdated items left in your backend. Sometimes you think all your plugins have been updated, but if you refresh the page in your backend you will see that the update might have failed for some of them.
- Clear the cache on your live website.
- Create one more set of screenshots on the live site (as you did at #10 for your staging site)
- Compare all screenshots taken from your live site (as you did at #11 for your staging site)
- Run your test scripts on your live site. (As in step #12 for staging site)
- Do a last visual routine check of the website.
- Grab a beer/coffee/tea/cappuccino and enjoy it. You deserve it 🙂
I know, I know. It’s a long list, a freaking long one. But it covers many unexpected scenarios and it will help you perform WordPress updates as smoothly as possible.
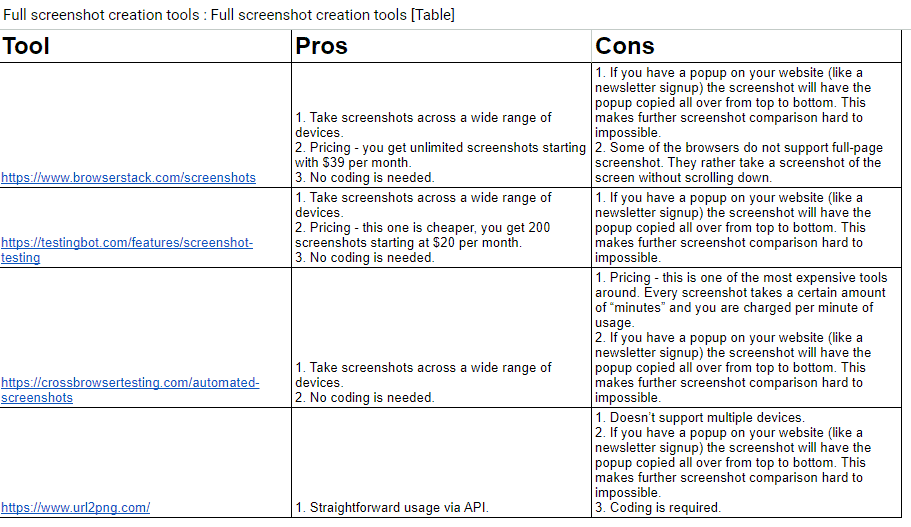
Full screenshot creation tools
When it comes to properly test, one of the key things within the process is to grab screenshots of your URLs and compare one another for any undesired changes. Here’s a handy list of the tools we have tested and are using for screenshot creation with their pros vs cons.
At WPRiders we use a mix of the following tools, depending on the project we’re working on:
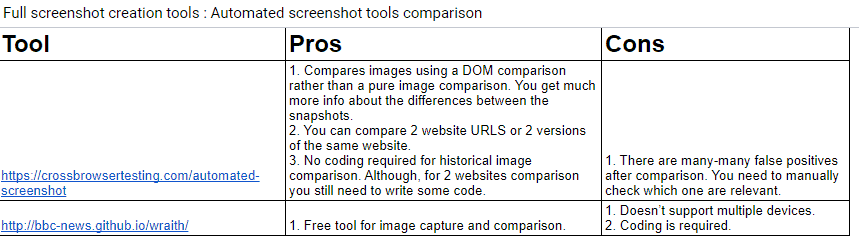
Automated screenshot tools comparison
Remember when I told you there were tools to automatically compare your screenshots? Well, here is where I keep my promise and list out some of these so-called image diff tools for you to run automated image comparisons.
Here’s what we use:
Testing your WordPress website using automated scripts
Finally, checking that your forms, checkout pages, and other critical areas are still working properly after the update is of utmost importance. As always, you could either check manually or you can use some scripts (or hire a developer to write them based on your specific needs) and automatically run the tests on your website.
Things you’d want to test and double-check via automated scripts can be:
- Fill in contact forms
- Add a product to the cart
- Your checkout process
- Select a date on a calendar on the front-end, then check in the back-end if the booking has been properly made.
These are just some examples of actions you can test with automated scripts, but of course, the possibilities are infinite.
Codeception is the framework we use when it comes to automating this kind of test.
The truth is that it takes some time to create a testing script, but once you have one, it will run and test your website across a wide range of devices to make sure your core website features still work properly. A testing script has several advantages over manual testing:
- Eliminates human error – a script doesn’t get bored or stressed, therefore it will catch things you’d normally miss as a human if you were to look at the same website 4 or 5 times on different browsers.
- Saves you time – long-running scripts can be left alone, while you are focusing on more important items.
- Saves you more time – scripts can be executed in parallel: you can test on 4 browsers and 2 devices at the same time and get all the results at once.
For example, to test a simple contact form, you can use a PHP script like the following one:
Closing remarks
WordPress updates are a must for every website owner. It’s not about whether to do it or not, it’s about HOW you’re going to do it. Or even better: how properly you’re going to do it.
As I already said, updating WordPress looks like an easy task. And to some extent, it is. However, testing properly your website or eCommerce store after the update process has been completed, is easier said than done.
Things can break really quickly.
If you are running a popular blog or a WooCommerce online store, how long can you afford to have your website not running properly? A few days? 24 hours? Money slips away fast when things are not as your customers want them to be!
So if you need a reliable and professional team who can take care of your WordPress updates on a monthly/retainer basis, we are always more than happy to help, giving you peace of mind too!
While if you’re more of a do-it-yourself website owner and would like to invest time into using some of the hints from this article, then our purpose is served: to pay it forward to the WordPress community and to help it grow further!
Hire Expert WordPress Developers
Looking to customize or develop a new website?


")
